FT Tools Tutorial: Part 1
By
Goldenbeast
"Making a simple building with a roof, a light, and a spawn point."
"Note: If you are stuck on part of this tutorial and have no idea what to do email me and I will help you."
Putting Down The Floors:
Before you start!!!
Click on the
Level button directly above your map display(that big white space). You
see that little yellow square on your map display? That determines map
boundries. Hold the up arrow key down for a moment or two. Now look at the
panel on the left. Click on the Set Top button. Now click on the screen.
It got alot bigger than it was! Just resize it so that you leave about 20
squares in both directions. This is just to be sure we have plenty of
room.
Getting to the floor tiles.
First things first. Start up the
editor and click on level editor. "OW!! My eye's all this WHITE!!" Yup
thats the void. Now we need to put down a few floor tiles for our
building. Click on the TILE button, now look on the left side of
the screen. For this tutorial we will be using the Ruined City tiles.
Double-click on the folder Ruined City.
Ok we're making floors right? Double-click on the Ruined city floors
folder. Lets make a nice carpet. Double-click on the CarpetedFloor
folder. "Wow finally got to some floor tiles. Now down to business.
Making some floor space.
Now we can make the floor for our
building. We COULD do this the easy way and just drag out a square, but we
aren't, Nope. You have to learn how to build maps ;). On the left hand
panel see the ones that look like they are in tact and not torn up? Click
on one, now hold down shift and click on each tile that looks in tact. Now
that you've done that go to the map display and pick a spot somewhere near
the center of the yellow square. Now click, don't be afraid it won't hurt.
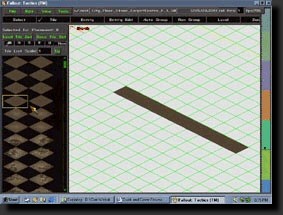
Good, you have your first tile down. Now the building in this tutorial
will be 10 floor squares tall and 10 wide. Now carfully place tiles side
by side starting from the first one until you have ten tiles in a line.
Like so:
Ok now we just need to finish it. Start at the tile at the very top and make another line. Continue to do this until you have a floor that is 10x10. Be sure it's inside the yellow box. If it's hanging out just move the yellow square so the floor is inside of it. Now we have our floor!
Putting up the walls:
Are you
with me?
Now if you just started with the
empty map that it gave you when you first came in then you'll be fine. But
if you went to File, New, we have a problem. Well sorta. When you start a
new one it sets the floor tiles at -1 instead of 0. So look at the big
mutli-colored bar to the right of the map display. If it says 0 your ok.
If it says -1 then do this:
1. Click on the Select
button.
2. In the map display click and drag over your floor making
sure that the green selection box is over all of the tiles.
3. Let go
of your mouse button.
4. Push and hold down Ctrl and then push the page
up hey ONCE.
5. That will put your tiles on the same level with the
rest of us.
6. Look at the multi-colored bar on the right and click on
the little mark above the one you are one. It should then say 0.
Finding the walls.
Here we go. Click on the Tile button. Now
look in the left hand panel. Right above the tile windows there should be
a button named Up. Click on it 2 times. Now you should
have a list of:
Ruined city floors
Ruined city objects
Ruined
city stairs
Ruined city walls
Double-click on the Ruined city walls
folder. Lets make a nice brick building. Double-click on the Type6 folder. That
wasn't near as long as the first one!
Putting up the posts
Ok. Go to that little multi-colored
panel on the far right. Click on the mark just above the one your on, it
should now say 1. Good! Now we want to go to the left hand panel and
scroll down to the very bottom of the wall list, see those grey colored
square posts? Click on one. Now for the tricky, proper, wall placement. Go
to the very tippy top tile. Now wait on the instructions or the rooves
won't lay correctly. Ok to correctly place the walls one unit must hang
out over the edge of the floor. Now place the gray square corner piece in
the very top corner. It should have half of it off the upper right edge
and also have a piece hanging off of the upper left edge. For
explination's sake, just line the little blue box on the bottom of the
post to where the blue squares upper edges line up with the edge of the
floor. If you having trouble here is an example:
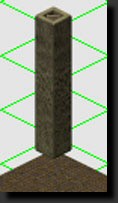
"But Golden, what are those little blue boxes?" Well, those show you the height from the ground floor. The blue box for your wall is 1 unit from the ground floor, now don't get scared it's supposed to be. That 1 unit is from 0 to 1 and the ground floor itself is aligned with the very top of 0 but JUST under 1. So, yes, they are sitting correctly. Now you want to put a post at each of the other 3 corners. And make sure that it has only that one piece touching the floor.
Putting the walls in..
Whenever you put walls up it's always
best to start at either the upper right or upper left side so that your
view won't be blocked while putting in walls. Still with me? Good! Now
choose a wall that head from the upper right to the lower left or \. I
like the solid ones personally. So for now lets use one of those. The
walls can be a pain in the arse sometimes so bare with me. Ok get the
solid \ facing one and go to the post at the very top. Line the wall up
with the post. That shouldn't be too hard to do but I'll explain it anyway
just to be thurough. just make sure the upper right or UR, lower left or
LL, and top are in line with the post's UR, LL, and top. and it will be
placed properly then. If lining them up is tough for you click on the
View button
and go down to Show Tile Bounding Box and click that. That should make it
EASY. Now just keep this up all the way down the line. Use the window,
solid, partially broken walls how ever you like. Just make sure they are
full walls not the ones broken at the top. If you keep with the brick wall
section at the bottom of the list you should be fine.
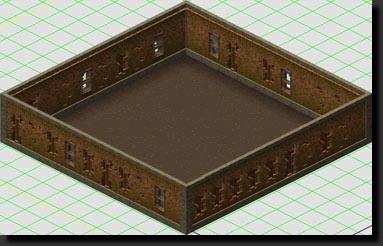
UH OH! we have a space that the normal wall wont fit in at the end! well that is easily fixed. Got to the bottom of the list, now click on the brick wall tile to the left of the grey post tile. "Hint: It's the one on the bottom row, second to the right." Now line that piece of wall up in that space between the post and the other brick wall. It should fit it quite nicely. Now we will do the upper left or UL side of the building. Now go to you tile list and select the brick wall that goes from the upper left (UL) to the lower right (LR). I think you know what to do here. Line em up from one post to the other. You'll get to use that one short piece again. Now you have 2 sides left and they work just the same as the upper 2. I'll get to doors in my next tutorial. so don't worry about those yet. Do you have all the walls done? Good! If you have little white lines all over you lovely building click the View button and go down to Show Tile Bounding Box and click it. Now hit the R key. OoOoOoOoOo, it has shading. Well all the walls are up! If you want to make rooms inside your building you can but myself and the others are going to move on to the next section, Roof Capping.
Roof Capping:
Finding the Caps
This has to be the easiest thing to do in
the whole tutorial. Go to your tile list, now scroll to the top.
Double-click on the CAPS folder. Small aren't they? Lets make
them bigger. Look right above them and you'll see Tile List Scale:
change that 0.5 to a 1. Much better..
Putting the Capping on top of the wall.
A thing to remember
is that walls are 12 units tall, and also that from 0 to 12 is one story.
Then that would mean the roof is 13, and so is our capping. so go to the
multi-colored bar on the right and click on the mark that seperates the
orange from the green. It should say 13. If it doesn't then keep looing
for it. It's not in the orange, and not in the green(sounds like a riddle
haha). Now that you have that done go to the tile panel on your left and
select a \ one. These are much like the walls exept you can start on any
side you like. But for now select a long \ one. You see that long blue box
when you drag it onto the screen? That is how high off of the ground floor
it is. Now remember the one unit thing that I blabbed on about? Well this
is why we had to do it. Take that long \ peice and go to the bottom corner
post. Line up the outside corner of the capping with the outside corner of
the post. If it looks like it's sitting on top of the post and it fully
covers the top side of the brick wall then you did it right. Now all you
have to do is keep them aligned and take them all the way around and use
the small filler pieces if you have a spot the long one wont fit in. The
upper left and upper right Capping won't cover the whole topside of the
brick wall, It should however cover half of it. When you're done it should
look like this:
If it does, GOOD! If it doesn't look ANYTHING like it then email me and I'll guide you though. Well on to the next section, Roofing.
Roofing, the easy way:
Finding the roof.
First off, remember that Up button? Well
it's right above your tile list. Click it once. It will take a while to go
down a directory. Click that Up button 2 more times. Ok now you should
be in the, floors, objects, stairs, walls directory. Double-click on the
Ruined city
floors folder. Now double-click on the Concrete folder.
Last one I swear. Double-click on the LightConcrete folder.
Getting your "roof" on. ; )
Scroll down the tile list until
you run across a whole bunch of complete light grey tiles. Click one, hold
down shift and click on the rest of the light grey ones. Now go on out to
you map display window. Go to the top corner, see that dark area on the
other side of that cap? Ok. Align the upper right and left sides of the
tile with the light area of the Capping. Remember. The darker area of the
Capping will be completely covered by your roof tile. After you place that
first one, just do like you did with the floor. And be sure that the
multi-colored bar says 13. If you aligned the tiles right the upper area
should look like this:
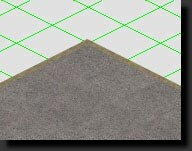
If it looks like the above and you have the roof covered then you are almost finished with the building.
Making the roof POP!
This part is easy, click on the Tools button. Now
go to New Occlusion Data and click it. I will ask if you want to rebuild
PVS. Click Yes. After it's done you will be taken back to the editor. Go
to the multi-colored bar on the right and take it down to 1. now move you
mouse over the building. Cool, eh? Well it IS a little dark in there. We
need some light. On to the next segment, lighting.
Lighting it up:
Getting to the lights.
Easy enough, click on the Entity button. See
the list box on the left? Look for, then double-click on the lights folder. Good. Scroll down
the list to the bottom, and find the file named small white light
and click on it.
Placing Lights
Now go to the map display and put that small
white light inside the building. Now press your R key. Ignore the light
from the one in your hand. The other one is kinda small though isn't it?
We need more light.
Editing Light Properties
Click the Entity Edit button
that's above your map display. Now click on the light that you just made.
See that list to your left? If you have a scroll mouse just click in it
and scroll down until you find the phrase Radius (meters). Change that 2 into
anything you want. Setting it to 8 looks good, it leaves the corners kinda
dark. There are a bunch of other things to play with in this list. A
little farther down they have a light color picker. It can make for some
interesting looking rooms. A little farther below that is the Use Arc checkbox.
Check it and play with Arc (degrees) value. you should be able to
figure this out pretty easy. Well all this light and noone to look at it.
That brings me to the next segment, Spawnpoints.
Spawnpoints:
Finding the spawn objects..
Click on the Entity button. Now,
click the Up button. Double-click on the misc folder.
Now you have several different types of spawns here:
SinglePlayerSpawn - Used for single player only missions.
SpawnGeneric - Can be used in multiplayer to spawn players.
SpawnPlayer - Used to spawn specific player groups.
SpawnRevisit - Used in single player. Sets a spawn when returning to a mission.
SpawnTeam - Used to spawn a specific team.
We will use SpawnGeneric for our spawnpoint. So click it and find
an area in your building to place it, and viola! But there is still one
more thing you need to do if you want to walk around in it using custom
mission. But I will get around to that in the next tutorial.
If you need any extra help or information email me.
Also reply with your Questions, Comments, or Rants. I want to know what people think about it. I have more planned but I'm not going to bother if people aren't interested.