SCENERY SPRITES IN SPRAY - by JJ86
I am going to assume you already have imported the image and
the color table into Spray. This guide will explain how to set up
the bounding box.
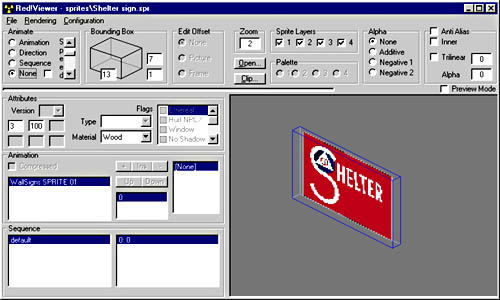
1. Open up your sprite in Spray and also with Redviewer. In Redviewer go under the Rendering menu and choose Bounding Box (Ctrl-U). This will show the box in relation to your image. The goal is to make it so that the blue box completely surrounds your image.
Also if you want to make a poster that is going to higher on a wall, the bounding box will have to extend further down.
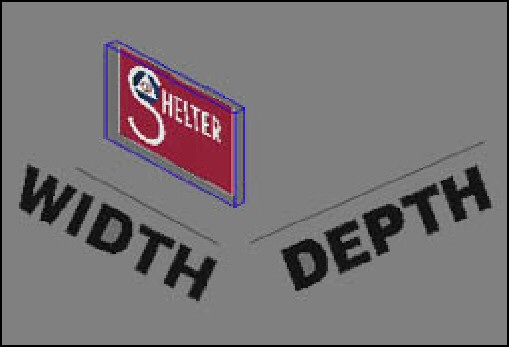
2. There are a few misleading field names in Spray. On the top left, where it says Sprite Header, this is actually the Bounding Box info. The top three values; Depth, Height, and Width are the three dimensions of the box as shown in the picture.
3. For my example, the depth of a poster will be 1, which is the minimum value that can be entered.
4. In Spray go to Image/Align big gui item. This will set the values in the Directions field s based on your image size. Enter the values from the Rgt. and Bott. fields in the fields for Center (x,y dword) respectively. This will be a starting point and may have to adjusted slightly.
5. Now comes the guessing part. I am not quite sure how the Bounding Box height and width values correlate to pixels so I just end up using trial and error. Enter some numbers, save, and go to Redviewer to see where the bounding box is and then make adjustments. The final result should look like the top picture, so that the poster is on the front face of the blue box.
6. To make the poster show up higher on the wall you will need to increase the height of the bounding box. And you will need to increase the y value of the center. It appears that every 1 in box height increase corresponds to an increase of y value of 5. You will have to adjust this to suit your taste and the final placement that you want.