MAKING A POSTER IN PHOTOSHOP 5.0
1. Open any rectangular picture in Photoshop. At this stage,
the image dimensions don't matter. One word of advice is not to
expect a lot of intricate detail to show up in the final sprite.
One big word may be legible but you may have to make the final
poster a larger size. For an example, I am making a poster of the
pipboy berserker. The starting image is 124 pixels wide x 127
high.
2. Let's bump the canvas size up from a height of 1.764 inches to 3.0 inches. You only need to increase the height and pick an even number that is almost double the original height.
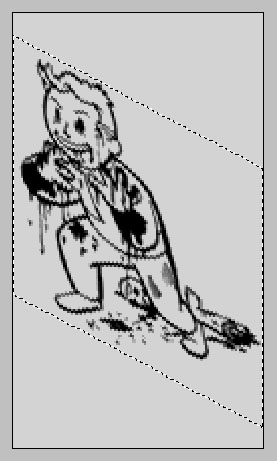
3. Use the rectangular marquee tool to draw a selection box tight around the part of the drawing you want to use as a poster.
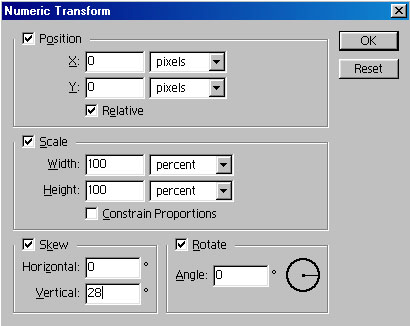
4. Under Edit/Transform/Numeric, you will open a dialogue box to which you want to enter a value of 28 for the vertical skew. Enter a value of -28 if you want the picture angled for another wall orientation.
5. Go to Image/Mode and check RGB color. We want to dirty up the image with some filters. A standard filter that should work is Noise/Add Noise. Use Uniform Distribution and enter a value of 40. Experiment and play around with other filters but don't go overboard. Remember that you are trying to make the picture blend in with the environment so you don't want to make it too clean looking.
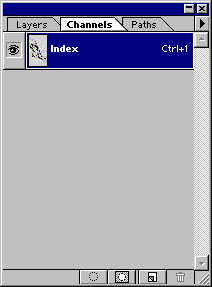
6. Go back and switch your image mode to Indexed Color. Use the default values in the dialogue box and hit OK.
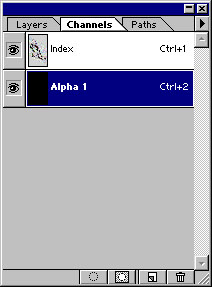
7. Find your channels toolbar and if it isn't on your screen, look under the Window menu and click on Show Channels. Here is where you want to add an alpha channel. Click "Create New Channel" and everything will go black. Click the gray box to the left of the Index channel and everything should now turn red. Hit the delete key on your keyboard to clear the area over the poster. Hit Ctrl-D to deselect.
8. Crop the image with marquee tool as needed to bring the height tight with the top and bottom corners of the poster. Go to Image/Image Size and change the height down to 50 or 60 pixels. If you lose too much detail, hit undo and try it at 100 pixels. Make a note of the image size.
9. Now just follow the normal method of saving the color table and the raw file. Import into Spray and make your poster sprite!